Where do you begin? Well first things first. You make the conscious decision that this is the day. It’s time. I want this.
For me that day was June 1, 2015. A nice easy date to remember. Kids out for the summer and home with me, I put them in charge of keeping me in line. They wound up instead being my cheerleaders, always encouraging me. Support is vital! So whether it’s family or friends, an online group, whatever, it’s always easier to not do this alone.
I won’t lie, those first few weeks were a roller coaster. Detoxifying yourself from sugar and carbs is rough. You’ll feel like you’re dying, like you have the flu. Don’t quit! Just get it over with! If you have just a little carbs/junk/soda to take the edge off you will have to go through this all over again. It’s not worth it. Just stick with it.
Tip #2 – The keto flu. When you start feeling yucky when just starting LCHF, there are several ways to get through it. Drink plenty of water, try bone broth, up your sodium (this really works!), and make sure you’re getting enough healthy fats so that you feel satiated and aren’t tempted to grab carbs.
Glowing Top Coat?

I still can’t get enough of China Glaze’s Electric Nights collection! This week I decided to sport the pink of the collection. Eye popping all on its own, it gets a boost under black light and glows electric.


While showing off this neat trick to a friend I noticed something strange. My mani looked messy under the uv lamp! Oh heck no! Now I know I applied my polish neatly and did clean up. What on earth was going on??
That’s when I realized it was my top coat that was glowing on my cuticles!
Yes folks, HK Girl’s Glisten and Glow top coat actually glows.


I wish I had gotten a photo before I did another cleanup but…yeah, no. I can’t have messy fingers out there.
But any way, now I know to watch out for that sneaky top coat. I swear it was like being in a chrime scene when they turn on the uv lamp and the blood stains show up and you swore you had gotten rid of every bloody footprint. Horrifying lol.
China Glaze Electric Nights 2015
Thanks to an awesome BOGO sale at Sally, I was able to get my hands on the entire China Glaze Electric Nights collection. The second this press release came out I knew I had to have it. Beautiful squishy neons that glow under black light? Yes please.
What better way to brighten my mood than to flaunt some flashy funky fingers. This mani is not unique I’m sure but it makes me happy happy happy.


For for this mani I used 6 of the polishes from the collection.
(L to R)
Glow With the Flow
Home Sweet House Music
Daisy Know My Name
Treble Maker
DJ Blue My Mind
Violet-Vibes
There’s a reddish orange and another purple I had to leave out simply because my nails had a hard enough time fitting the 6 I did use.
I sponged a gradient over Zoya Purity to give it a little pop. Neons always look better over a white base.
For easier cleanup I brushed some hair glue around the nail before sponging. It peels right off and saves so much time!
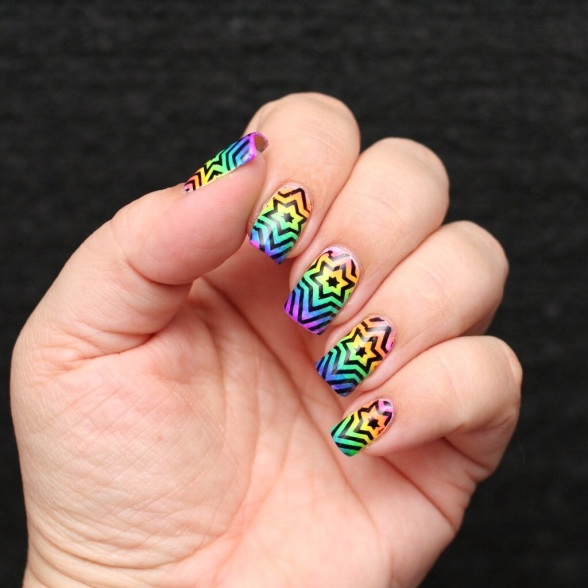
Stamping plate is From BornPrettyStore.com plate BP 11.
Stamping polish is Mundo De Unas black.
I used my Creative Shop stamper and scraper. The scraper is my hands down favorite. The stamper has been finicky for me. Today I fought with it less than last time so I’m not cranky with it. Review on that coming soon.
Top coat is HK Girl from Glisten and Glow. It has replaced Seche as my go to top coat. This stuff is awesome. Quick drying, high shine, extends the life of my mani, works great with nail art.
Thank you China Glaze for making this collection! It’s just happy colors and lord knows we need something to brighten our moods after this yucky winter. The set also has three funky glitter toppers that have an indie vibe to them.
Happy stamping everybody and I hope y’all can get your hands on these neons.

Custom Saints plate from Fig Tree Jewelry
Since I first started nail stamping, I’ve been searching for the perfect plate for my favorite team. I started by buying any plate I could find with a fleur de lis on it, but they just weren’t quite right. Then I discovered custom plates.
Fig Tree Jewellery, an etsy shop in the UK, offers custom plate engraving. You can find her here: -Custom Stamping Plate-
Make sure you read the entire listing and all articles linked in it. It explains in detail how to choose the best images. When you’re ready, just contact her with the images and she will let you know if they’ll work or not. Have an approximate size in mind also.
Once payment is made, things go fast! Within hours, Cassie had a mock up sent to me. From there we made adjustments to size and finalized my plate. Within 24 hours the plate was made and tested, with photos emailed to me for approval. I’d say from start to finish and plate in my hand in the US, it took all of a week. She’s super fast! She answered my emails quickly and was always so nice to work with. The whole process was wonderful and I’m already planning my next plate.
Here’s the mock up.

Notice the ruler on the sides. It really helps when making adjustments to size.
And here is the finished product.

As with all plates, it has a learning curve. Mine doesn’t like rough scraping, it takes out too much polish. Light scraping gave me the perfect stamp. I drew one design especially for decals and Cassie made sure that one worked perfectly for me.
The plate is heavy duty and pretty thick. No worries about bending or denting this baby!
And here’s my first official Who Dat Manicure. I definitely need more practice, but it’s worth it!


To all my stamping ladies, just a note. This is a great way to get your hubby on board the stamping obsession. What once elicited eye rolls and comments like “Do you really need more plates/polish?”, now has him participating in helping me find suitable images. My first test stamp was not to a piece of paper or to my nails. The first stamp went on his thumbs.
Are you ready for some football indeed. 😉

Bundle Monster CYO Collection 2013 plus tutorial
I recently got the Create Your Own collection from Bundle Monster and have been having a blast testing them all out. Unfortunately there were several that had problems (mis etched designs that just wouldn’t work) so I had to wait for replacements to get to this one. (BM, as usual, had great customer service and sent replacements without question and very quickly! Bravo!)

BM423 is probably my favorite plate in the whole collection. Chevrons are so in right now and using striping tape to do it just takes way too long.
Ready to play? Today’s mani uses ILNP’s Molly as a base and A England’s Excalibur to stamp. Top coat, as always, is Seche Vite.


And here is the setup. I used Fab Ur Nails rectangular squishy stamper, an old Walmart gift card as a scraper, an old eyeshadow brush for cleanup, and good old acetone.

After cleaning the plate with acetone, paint the design with your stamping polish. Not too thin or it will dry too quickly, but not to thick or it will smudge.

Hold the gift card at a 45 degree angle and, applying pressure, scrape across the plate, removing the excess. This is where practice makes perfect. You will learn just how much pressure and how quickly you need to scrape. Every plate brand is different too. This particular image I had to scrape with the stripes. The other direction left streaks and removed too much from the peaks of the chevrons. Like I said, just play and experiment.


Now pick up the image with the stamper. I like the rectangular stamper because it makes things easier to line up when doing full nail images. Just line it up and press down. I do a rolling motion with this stamper. With my XL stamper, which is much softer, rolling causes blurring and distortion and i get a better result pressing straight down. Yet again, play and experiment.


Now it’s time to transfer the image from the stamper to the nail. Time is of the essence. Some polishes dry faster than others so how much time you have depends on that. Line up your stamper with your nail and roll the image on. (Sorry no pics of this. I guess I need a third hand. Five more nails to paint yay!) Again, this depends on your stamper. With a squishy stamper you would just press straight onto the nail rather than roll. I find my rectangular stamper is in between the konad firm stamper and the squishy stamper. Soft enough to hug my curvy nail but firm enough to roll.
In this photo, my middle finger is the one freshly stamped. (I had issues getting the chevrons straight on that finger and had to remove it several times so it became the example here. Naughty finger!!) You can see the excess stamping on the edges. Gently press down on any excess that hasn’t quite gripped the nail.

Clean up cuticles with eyeshadow brush dipped in pure acetone. Apply cuticle oil/balm after.


I’ll get a daylight photo just as soon as the sun decides to return. Holographic polishes absolutely transform in the sun!
Happy stamping!!
Check back soon for more pics and links to the products used in this tutorial.
Purple passion
I have a problem with purple. Yep.
Blog post coming with my list (seen behind the wheels.) did I mention I have two more purples coming this month? And for sure one from the Zoya fall pixie dust collection. Intervention anyone?

Just to be fair, here are my golds as well. A saints fan can never have enough gold!

4th of July Nail art


Polishes used
Blue – Wet N Wild Fast Dry in saved By the Blue
Red – Zoya Carmen
Glitter top coats:
Dollish Polish It’s A Me, Mario! (The stars are so hard to get out! Really wish there were more stars in the bottle.)
Icing Glamourous
Stamping polishes used:
Konad Special Polish in White
A England Excalibur
Stamping plates used:
Bundle Monster stripes are plate BM 201
Stars are Pueen plate 44 (both stamped cleanly and easily. Maybe it’s the plate, maybe it’s the polishes, who knows. Winning combo.)

Enjoy the BBQ y’all and please be safe when blowing up small objects for fun. Would be a shame to lose fingers in a tragic fireworks accident. Less nails to paint. 😧
Review – Ulta Nail FX set
The Ulta Nail FX top coat set comes with four different top coats to give you four different effects for nail art. It retails for $14 in Ulta stores.

What’s in the box:
Color Enhancing Topcoat – Brightens and intensifies any nail enamel. pops in direct sunlight and glows under black light.
Matte Topcoat – Create a matte effect when applied over any shade.
Holographic Topcoat – Futuristic rainbow holographic effect when used alone. Silvery holographic frost when used over any colored nail enamel.
Smoky Topcoat – Gives any shade of nail polish a dark smoky effect. Extends wear and increase (sic) shine.
(Descriptions taken directly from the back of the box. All four are listed as Formaldehyde, DBP, and Tolulene free.)

First impression –
Typical Ulta bottles. No minis in this set like their other sets usually have. All full size topcoats.
The color enhancing topcoat looks like a normal gloss top coat with a slight blue tinge.
The matte topcoat also looks typical for a matte. Milky semi clear in bottle.
The holographic topcoat has a grayish look to it.
The smoky topcoat looks……well…..black.
Ok, here we go. All 5 swatches are a blue polish (Wet N Wild Fast Dry in Saved By the Blue) with two coats and no Seche Vite.
From left to right
Base color with no top coat.
Color Enhancing
Matte
Holographic
Smoky
First, no flash.

With flash.

The Color Enhancing topcoat is glossy. Will update with shots in sunlight and under black light when I can. Otherwise it’s rather unremarkable.
The matte one isn’t very matte. It looked virtually identical to my base color with no top coat. Not glossy but not very matte. Meh. I much prefer Essie Matte About You or even the very economical NYC Matte Me Crazy.
The holographic. Wow. On its own it’s rather blah as a silver holographic polish. Spend a little money on a brand that uses high quality holographic pigment. Try FNUG or Layla. As a topcoat it’s way too thick to be used. Base color barely shows through even at one coat over a dark polish. For comparison, I went ahead and put one coat of my favorite holographic top coat My Private Rainbow from I Love Nail Polish on the originally non top coated swatch.


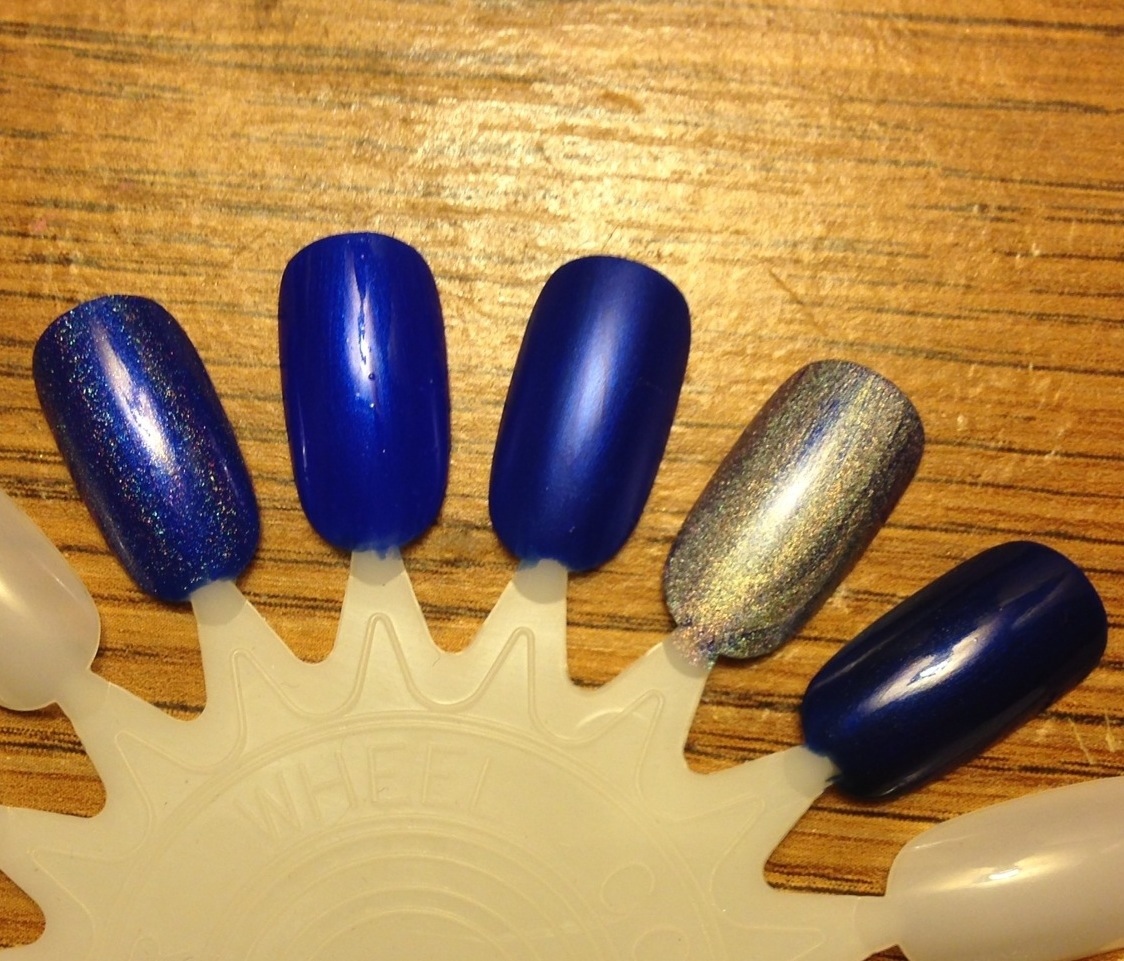
Now that’s what I’m talking about! One coat of My Private Rainbow on nail one vs one coat of Ulta Holographic topcoat on nail 4. At two coats (not shown) the first becomes a holo queen while the fourth becomes…….silver. ![]()
Finally we have the smoky topcoat. It’s basically a black jelly polish. A very light black jelly polish. It changed the color, otherwise I can’t speak for its ability to “increase wear”.
As a fan of nail art and unique finishes, this kit is disappointing. If the color enhancing one works as described (and I’m not holding my breath on that one) it might be worth the purchase. We go to skating rinks and bowling alleys that love black lights so I would definitely use a top coat that could make my nails glow like crazy. Ulta probably should think about selling these individually but in my opinion, they’re pretty much junk. Save your money folks.
The products in this review were purchased by me. The opinions in this review are my own.
Update 7/14/13
Finally got to test out the black light responsive top coat.
Here’s two coats alone on my little one’s nails.

And here is two coats over my regular mani of I Love Nail Polish’s Cosmic Barney, a very dark purple holo. I only did my pinky as this top coat does bubble and no way was I ruining my holo goodness for a few hours at the bowling alley LOL. But it works, and works well.

Julie G Gumdrops
Currently my favorite purple textured polish. Hoping Zoya comes out with a royal purple pixie dust like the royal blue from their summer collection.
Enjoy!

Star Trek Inspired Nail Art
Saw this on another blogger’s site and knew I had to try it for opening week of ST: Into Darkness!
Original is from Work Play Polish . Hers is much neater lol
Hardest part? Finding a blue and gold that evoked a classic trek uniform vibe. Red was easy 😉
Happy hunting!

